Deploy your Gatsby Cloud project with Hygraph webhooks
The Gatsby integration has been deprecated and no longer receives support. Please migrate to using webhooks by following the steps shown Here .
If you are using Gatsby Cloud for your deployments, you can use Hygraph webhooks to automatically deploy when content changes.
#Prerequisites
- You must have a Hygraph account. If you don't have one, you can create one here.
- You must have a Hygraph project. Read this document to access further information on how to create Hygraph projects.
- You must have an Gatsby Cloud account. If you don't have one, you can create one here.
- You must have a Gatsby Cloud site. Read this document to access further information on how to get started with Gatsby Cloud.
Webhooks are environment specific. This means their configuration is applied per environment. Take this into consideration if you're working with a project using more than one environment.
#Your Gatsby Cloud site
You can use your pre-existing Hygraph powered Gatsby site in Gatsby Cloud - if you have one - or you can create a new site by importing your pre-existing Gatsby project from a GitHub repository. You can follow this guide for instructions on how to do this.
During the setup process, you will be asked to provide the necessary environment variables for your Gatsby site to build:
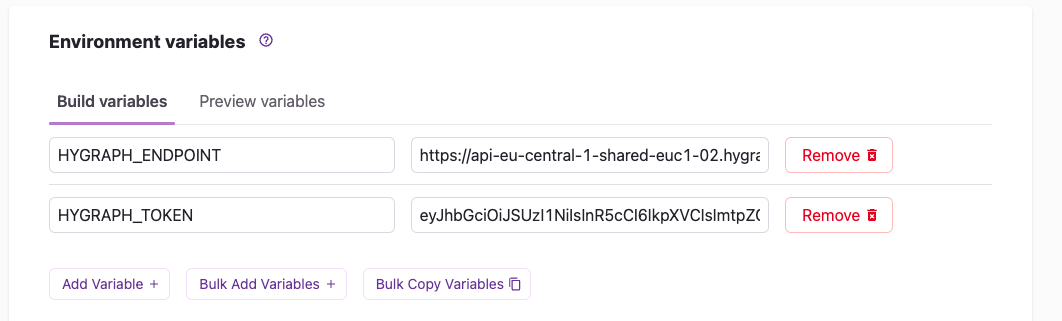 Environment variables in Gatsby Cloud
You will find this information in your Hygraph project by navigating to Project settings > API access.
| In Hygraph | In Gatsby Cloud |
|---|---|
| Content API | HYGRAPH_ENDPOINT |
| Permanent Auth Tokens | HYGRAPH_TOKEN |
You will find the Content API URL under Endpoints. Scroll down to the bottom of the screen to find the Permanent Auth Tokens.
You can follow the same process for Build variables and Preview variables in Gatsby Cloud.
#Configure webhooks
The first thing you need to do is navigate to your Gatsby Site, go to Settings > Webhook, and copy your Builds Webhook. Follow these steps afterwards:
- In Your Hygraph Project, go to Webhooks and click on the
Addbutton, located in the upper right corner of the screen, or on the+Add Webhookbutton at the center of the screen. - The
Add webhookscreen will display. Complete the following information:- Name: Name for your webhook.
- Description: Description for your webhook. Optional field.
- Include payload: Switch. True by default. If true, data will be sent via the webhook.
- Method: Dropdown menu that allows you to select an HTTP method from a list. The default value is POST, but you can also select DELETE, GET or PUT.
- URL: Webhook URL. This is where you paste the Builds Webhook that you copied from your Gatsby Site settings.
- Secret key: You can optionally add a secret key to sign the payload of your webhook. The secret key allows the other end to check that the source is genuine. This can be used to verify requests and, for instance, avoid triggering deploys from unknown sources.
- Triggers: This is where you select which Models, Stages, Actions and Sources should trigger your webhook. Each item has a dropdown menu, where you can select one or more options. Selecting none acts as a wildcard, then all models will trigger the webhook. If you're a developer, this document contains some more information on triggers that might be useful to you.
- Headers: Here you can configure your headers by adding additional Key and Value data, then clicking on the
Addbutton. You can add multiple key-value sets, and you can delete the ones you added by clicking on the trash icon. Some endpoints require authentication using API Keys, which could be set here.
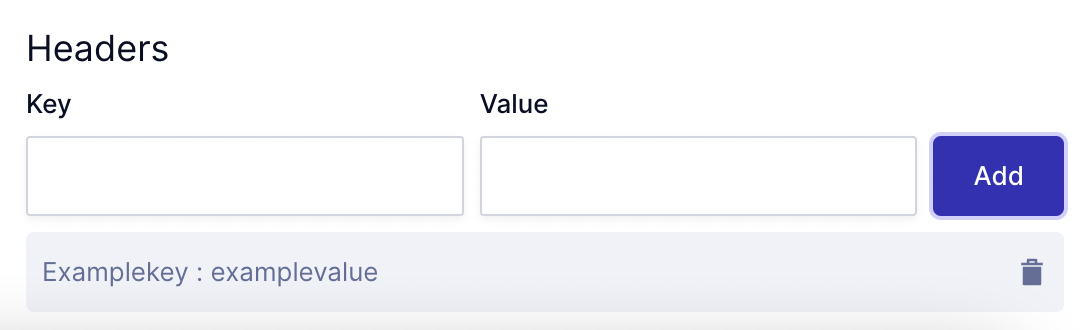 Gatsby webhook example - Headers
Follow the same process to create a second webhook using the Preview webhook from your Gatsby cloud site if you want to create a preview link as well.
#Trigger a Gatsby Cloud build from Hygraph
Once the webhook has been configured, performing one of the trigger actions will trigger a build in Gatsby Cloud.
For instance, if the trigger actions you configured for the webhook are PUBLISH and UNPUBLISH, doing either of those actions in the Content editor will trigger a new build in Gatsby Cloud.
You will be able to check the new build in your Hygraph project by checking the logs. You can also see this in your in your Gatsby Site, under Master > Build history.
#Migrate from Gatsby integration to webhooks
Follow these steps to migrate from your Gatsby integration to webhooks:
- In your Hygraph project, navigate to Apps and locate your Gatsby integration card.
- Click on the trash icon to delete.
- Finally, navigate to Webhooks and follow the configuration process.