Workflows
#Overview
Creating workflows is essential to managing larger teams and ensuring that errors do not slip through the cracks when teams create and update content using a CMS. Hygraph is no different.
Your workflow is the set of steps your content goes through, from creation to publication or removal. It's a systematic way of managing the lifecycle of content.
Hygraph offers a default workflow where content goes from DRAFT to PUBLISHED, which uses our default roles - Admin & Editor.
Depending on your plan, we also offer the possibility to create custom workflows with additional custom stages - like Review -, roles - such as Contributor & Developer - and even custom roles.
You can make it so custom roles with specific permissions can take content through different stages, ensuring only the users assigned to a certain role can perform a set of actions according to your configuration.
This is really useful, for instance, in approval workflows where the users who write the content are not the same users who approve it for publishing.
#About Hygraph content stages
Content in Hygraph that has been saved but has never been published, exists only in the DRAFT stage.
When promoted to the PUBLISHED stage, content will exist in that stage, and also in DRAFT.
When you update a content entry and save without publishing, that new content will be saved in DRAFT and the entry will show a blue Published pill on the content table, indicating that it's outdated.
Content being outdated means that the version currently saved in the DRAFT stage contains changes that have not yet been promoted to PUBLISHED.
#What you can do
- You can create secure workflows by using Custom Roles. Custom roles allow teams to give specific permissions depending on the person's role on the project. This ensures that team members don't interact with functionality that's not relevant, and prevents them from prematurely publishing something.
- You can use the Content Staging and Content Versioning features to create workflows.
- You can use Content Staging to compare and revert changes between content in
DRAFTandPUBLISHEDstages. This workflow can be further empowered by setting up a Custom View, which allows you to see all content that matches certain criteria in theDRAFTorPUBLISHEDstage.
#Basic workflow
Out of the box, every Hygraph project includes two content stages - DRAFT and PUBLISHED - and two roles, Admin and Editor.
These are system content stages and roles, which cannot be edited.
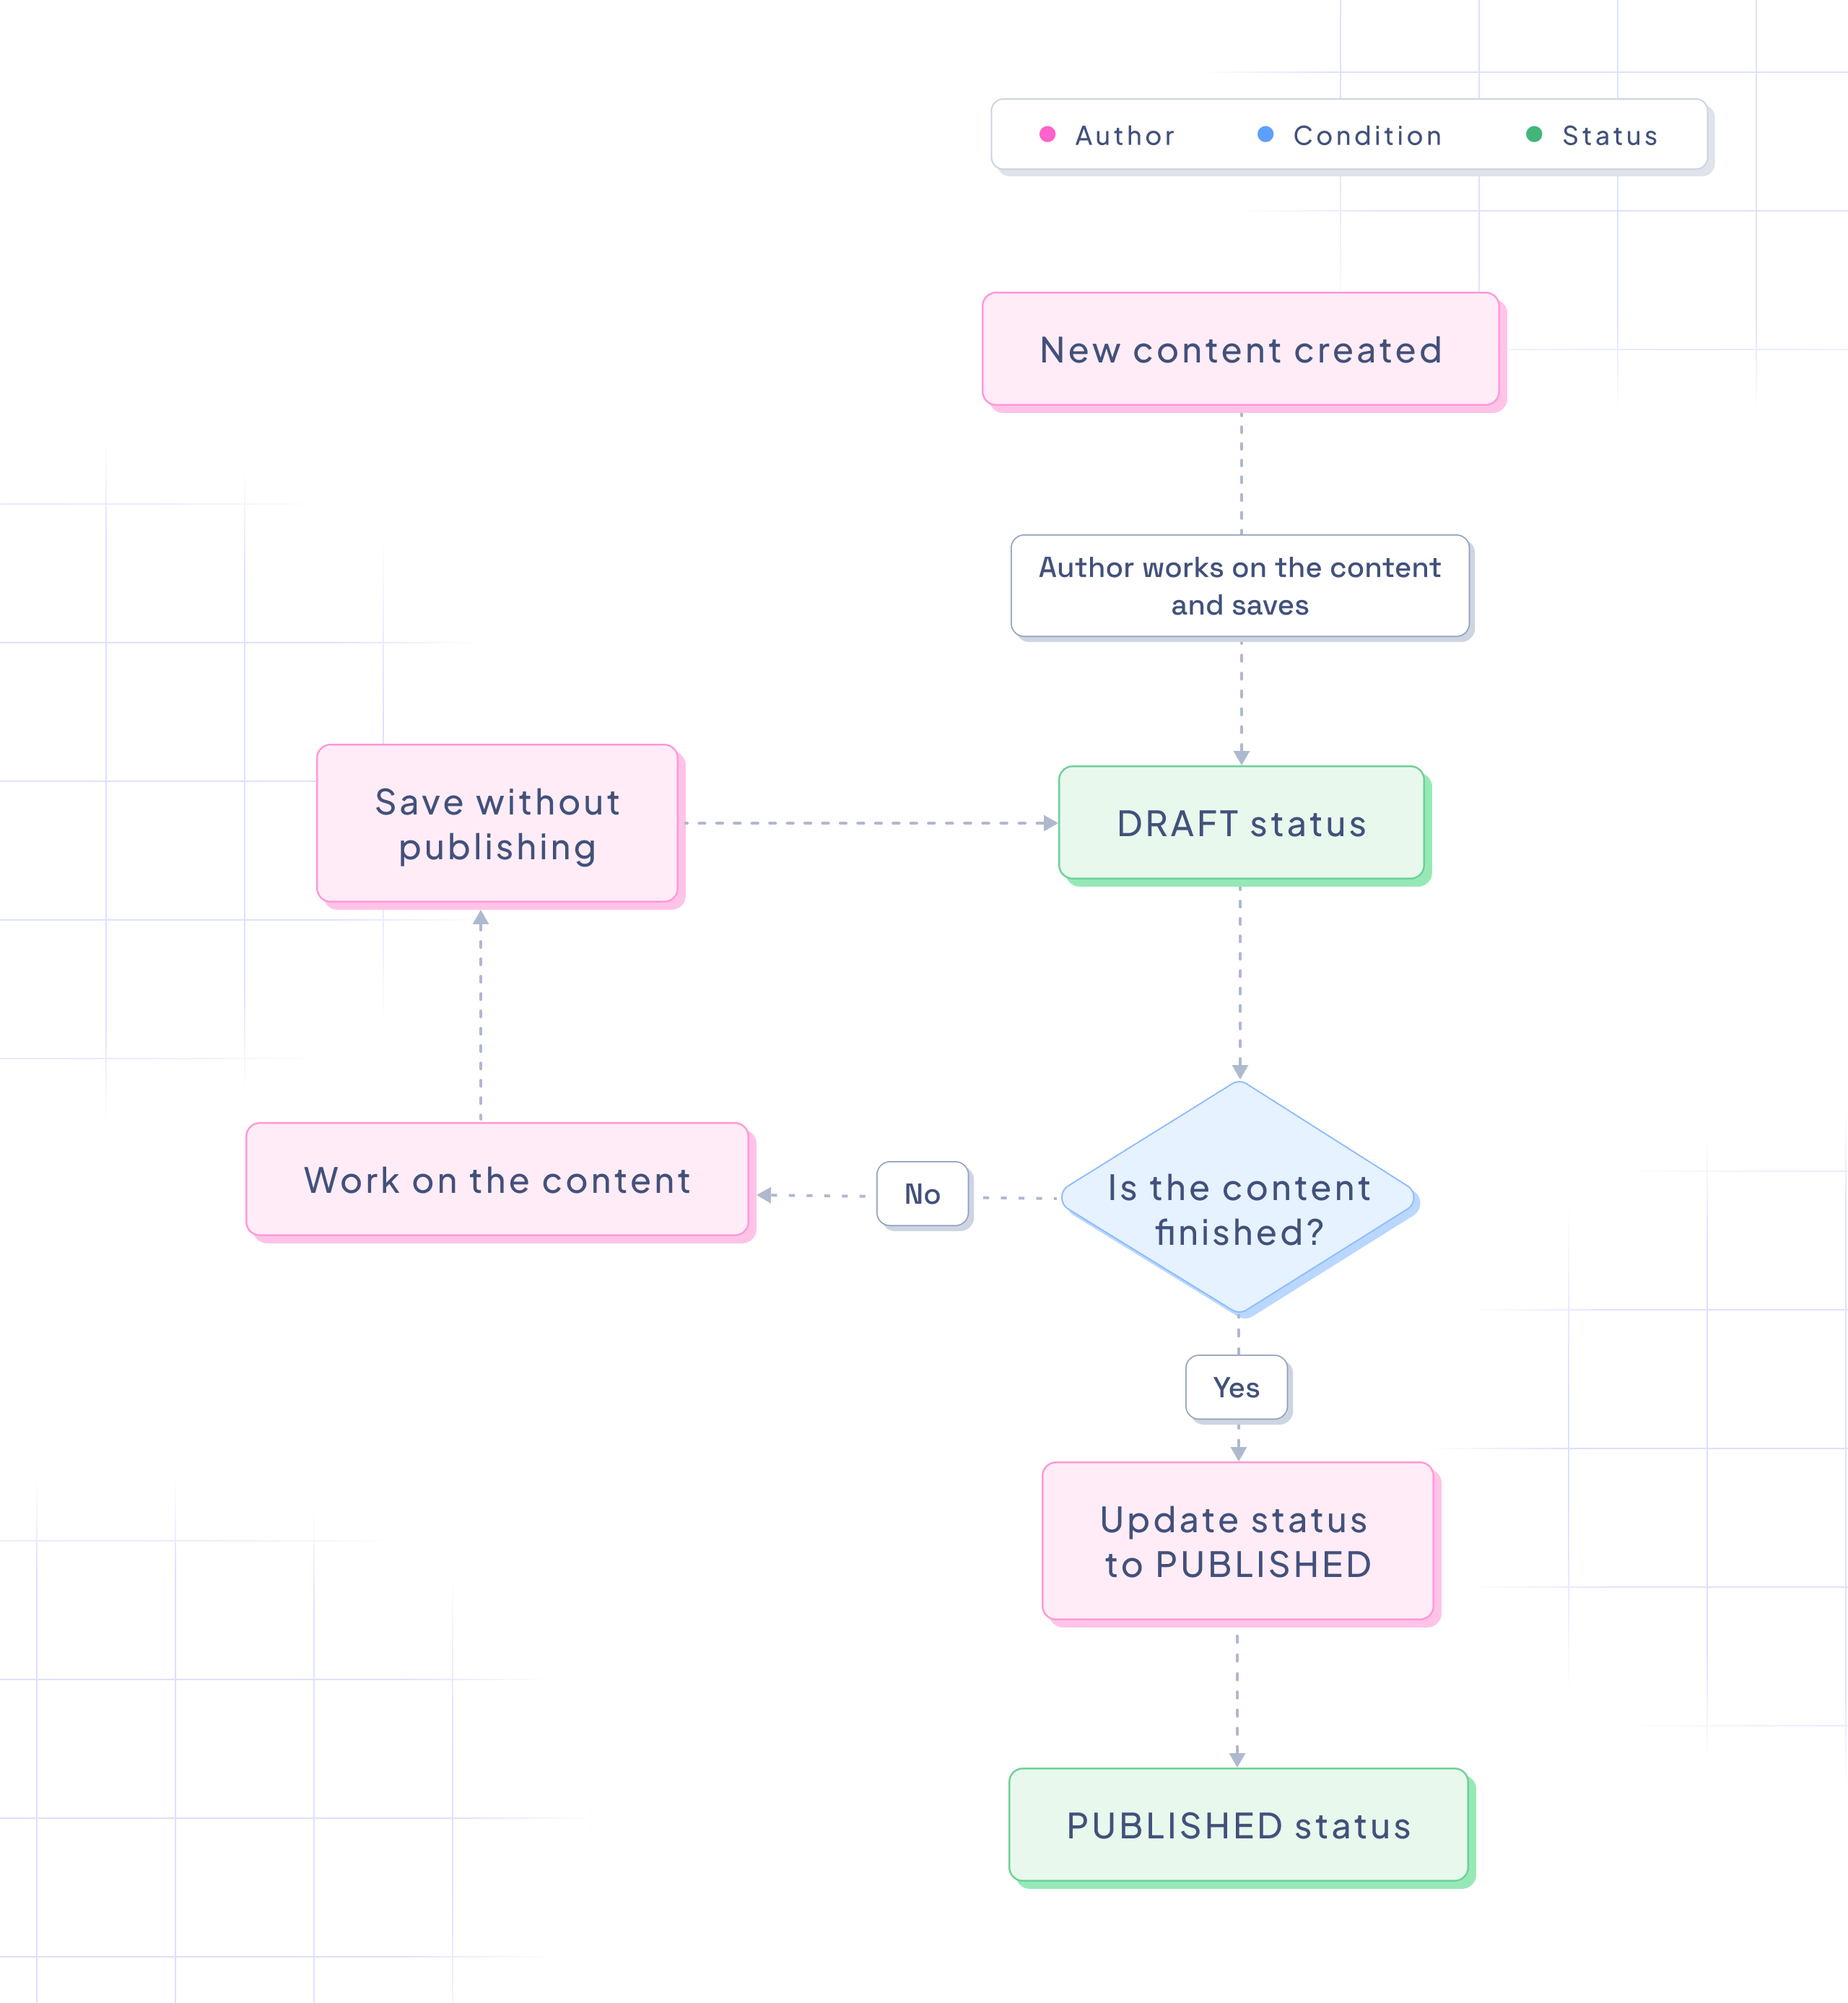 Basic workflow
Users assigned to the Admin role can manage teams and create/update projects, while users assigned to the Editor role, can create, update and delete content.
Since these roles are not custom, you cannot customize user authorities and permissions on content models, locals, stages, etc.
This means that all users that you add to the project can move content from DRAFT to PUBLISHED.
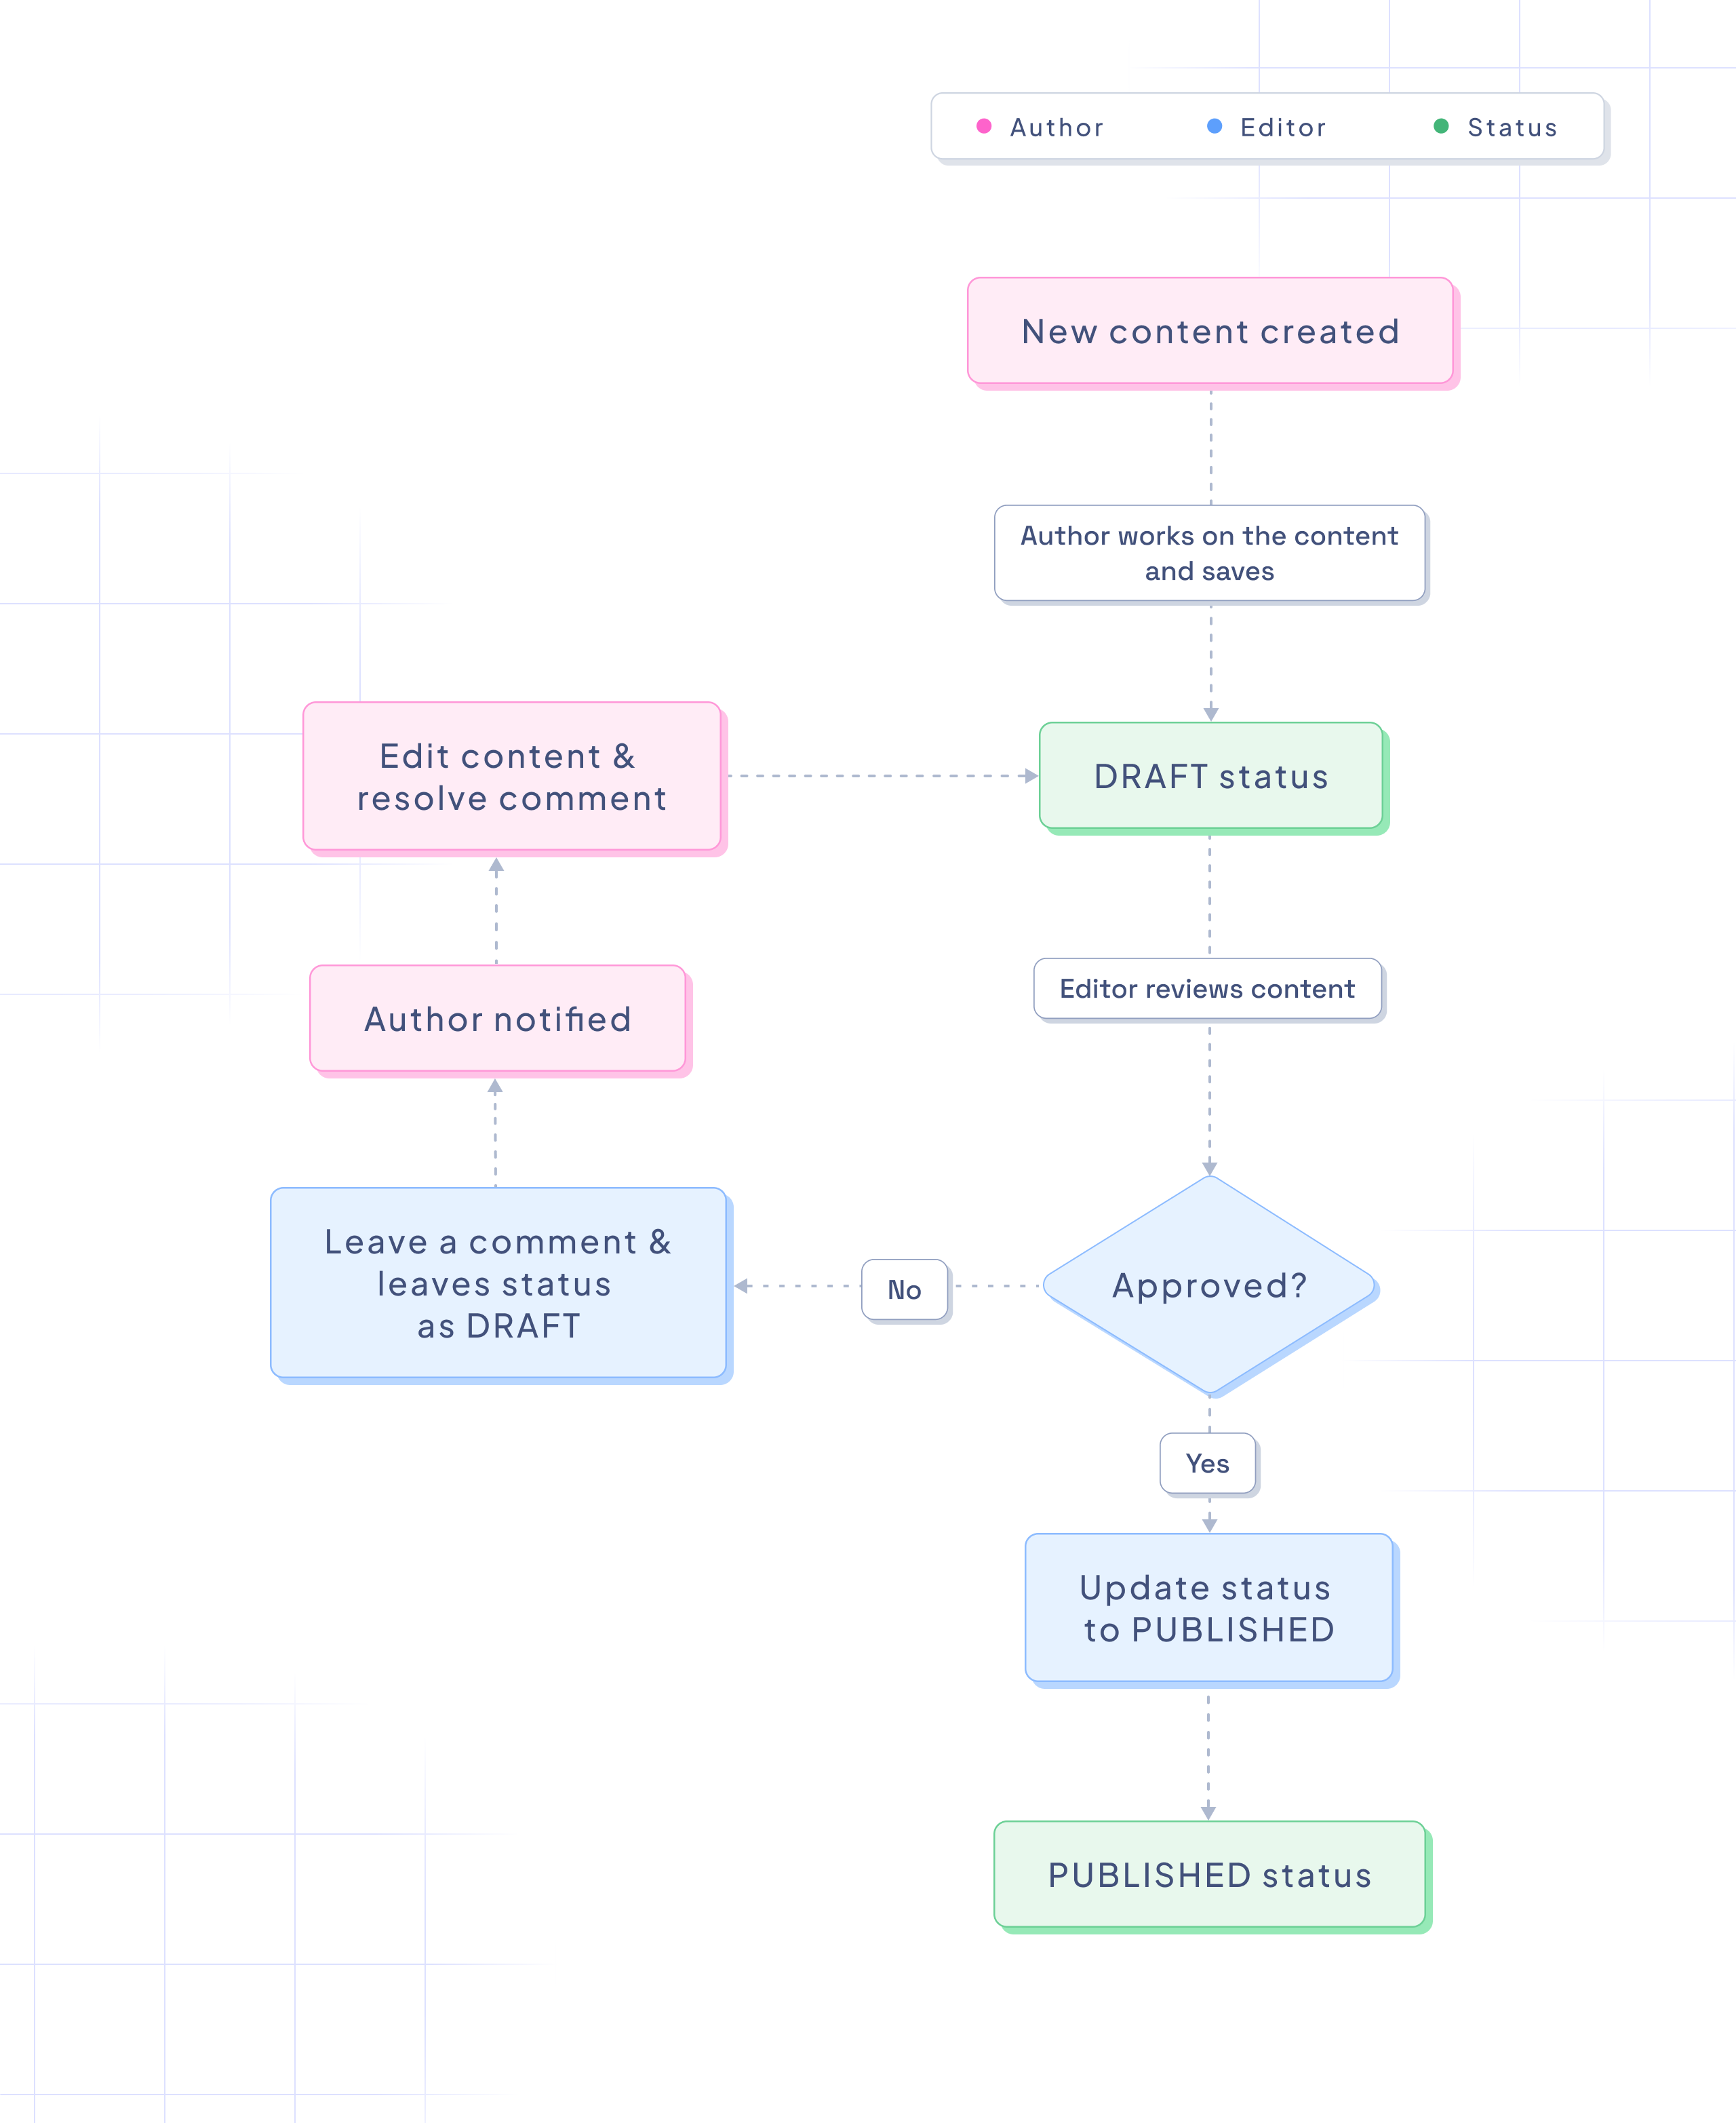
#Approval flow with 2 stages
The following example is an approval flow with 2 content stages - DRAFT & PUBLISHED - but with custom roles, which in this case we've named Author and Editor.
 Approval flow with 2 stages
As you can see, the Author role creates the content, which is then supervised by the Editor role. The Author can only save the content as DRAFT, while the Editor can either choose to publish the content to PUBLISHED, or else leave it as DRAFT and add comments for the Author to keep working on it.
In this setup, the Author would have create permissions and only the Editor would have publish permissions to take the content from DRAFT to PUBLISHED. This prevents publishing unsupervised content by accident.
#Set up approval flows with 2 stages
This workflow uses the default content stages, as well as the system Editor role, and the system Contributor role we get out of the box with a plan upgrade.
After upgrading your plan, if you navigate to Project settings > Access > Roles & Permissions, you'll see the following roles available out of the box:
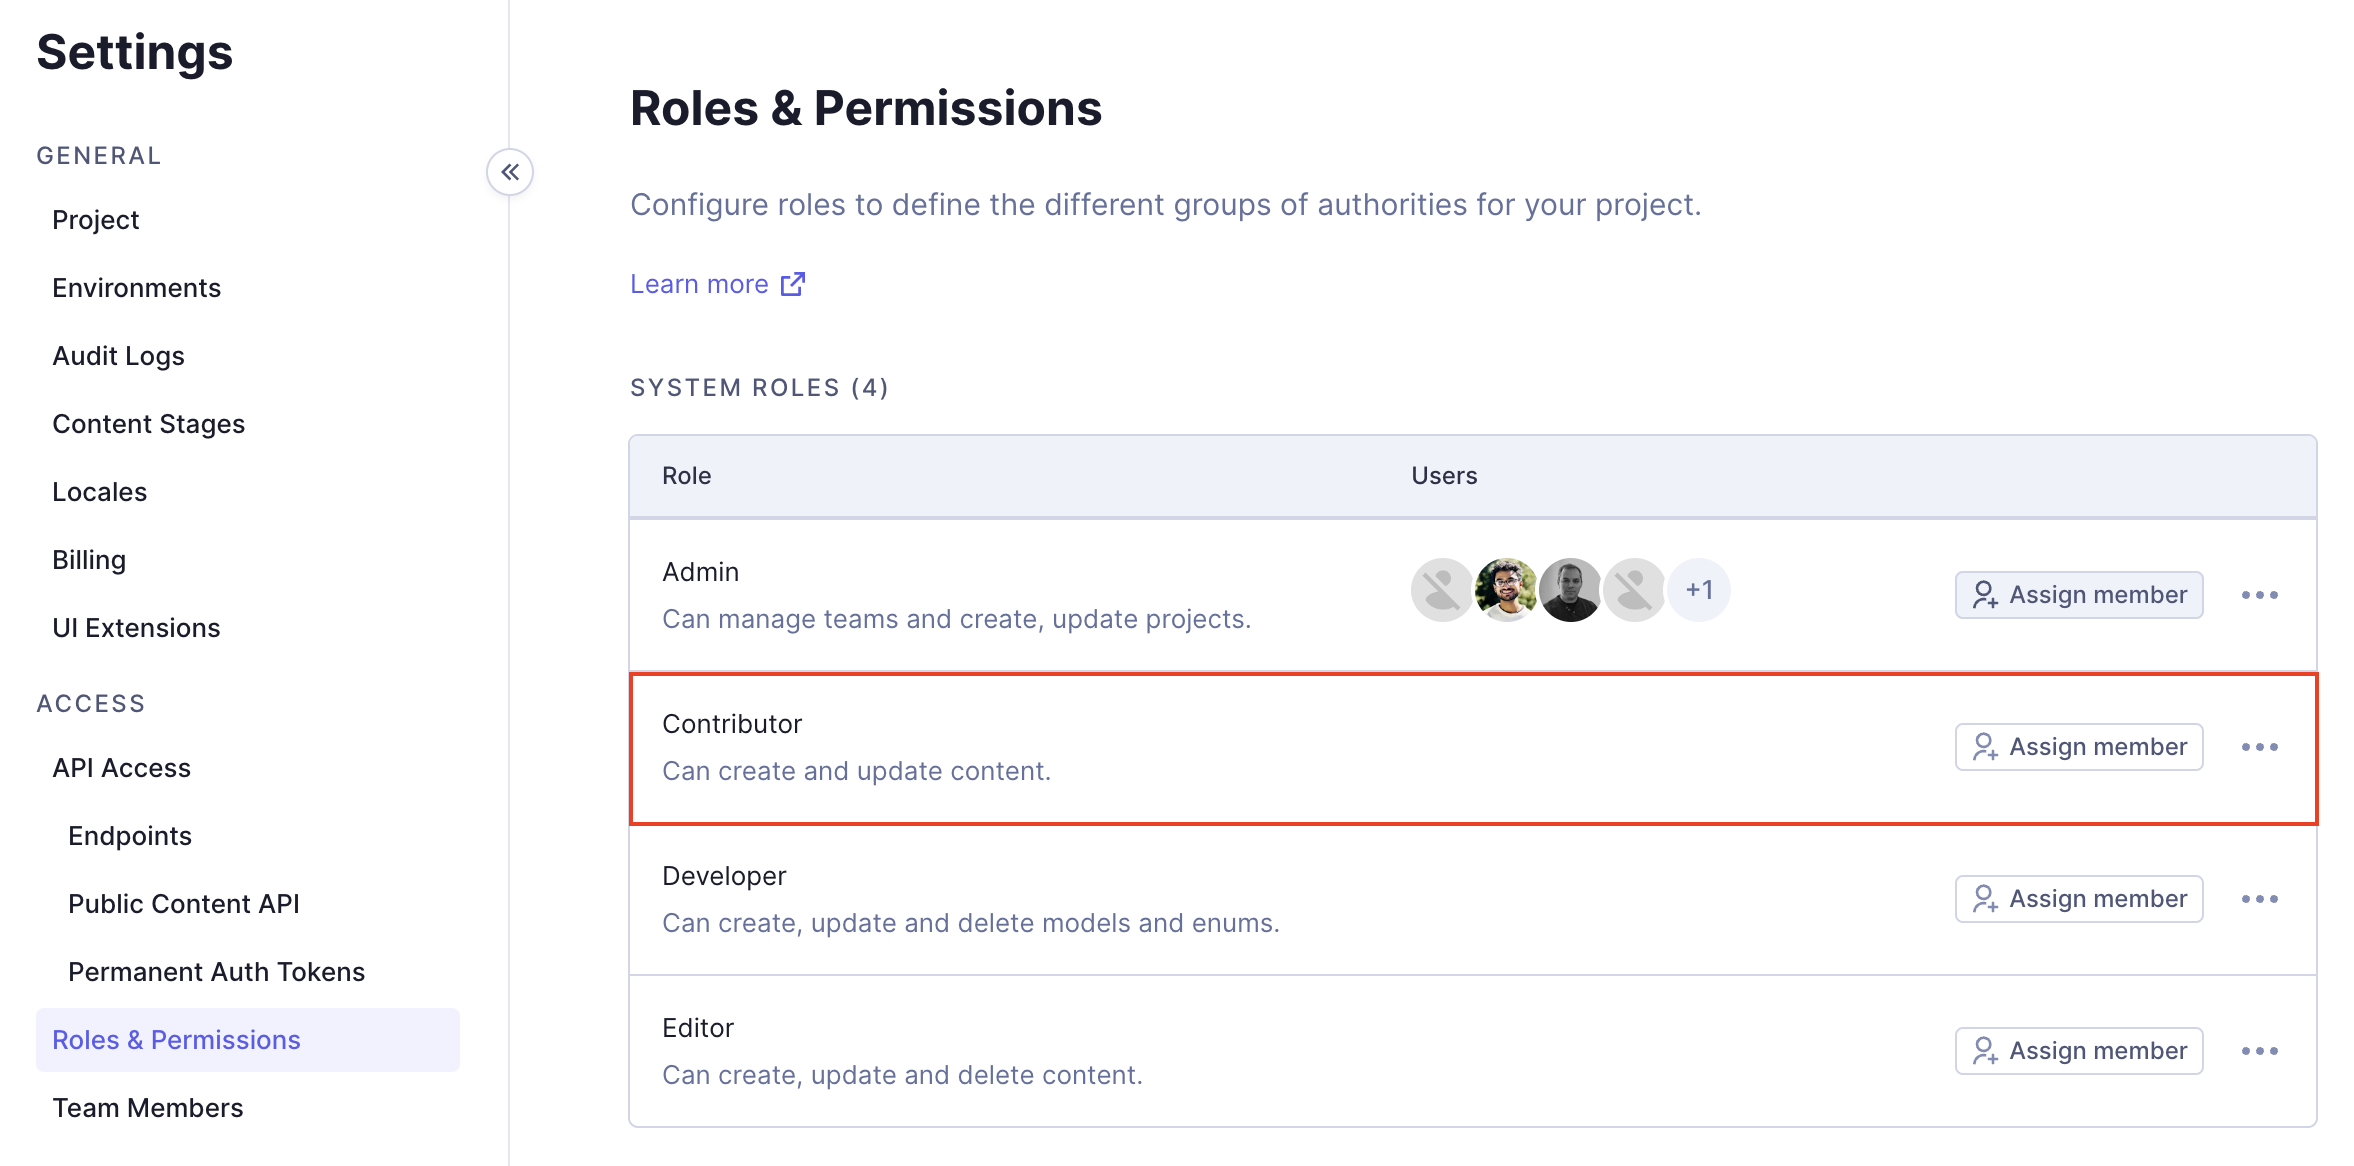 Four roles out of the box
If you go over to the Contributor role, click on the three-dots context menu and select View permissions you'll see the following:
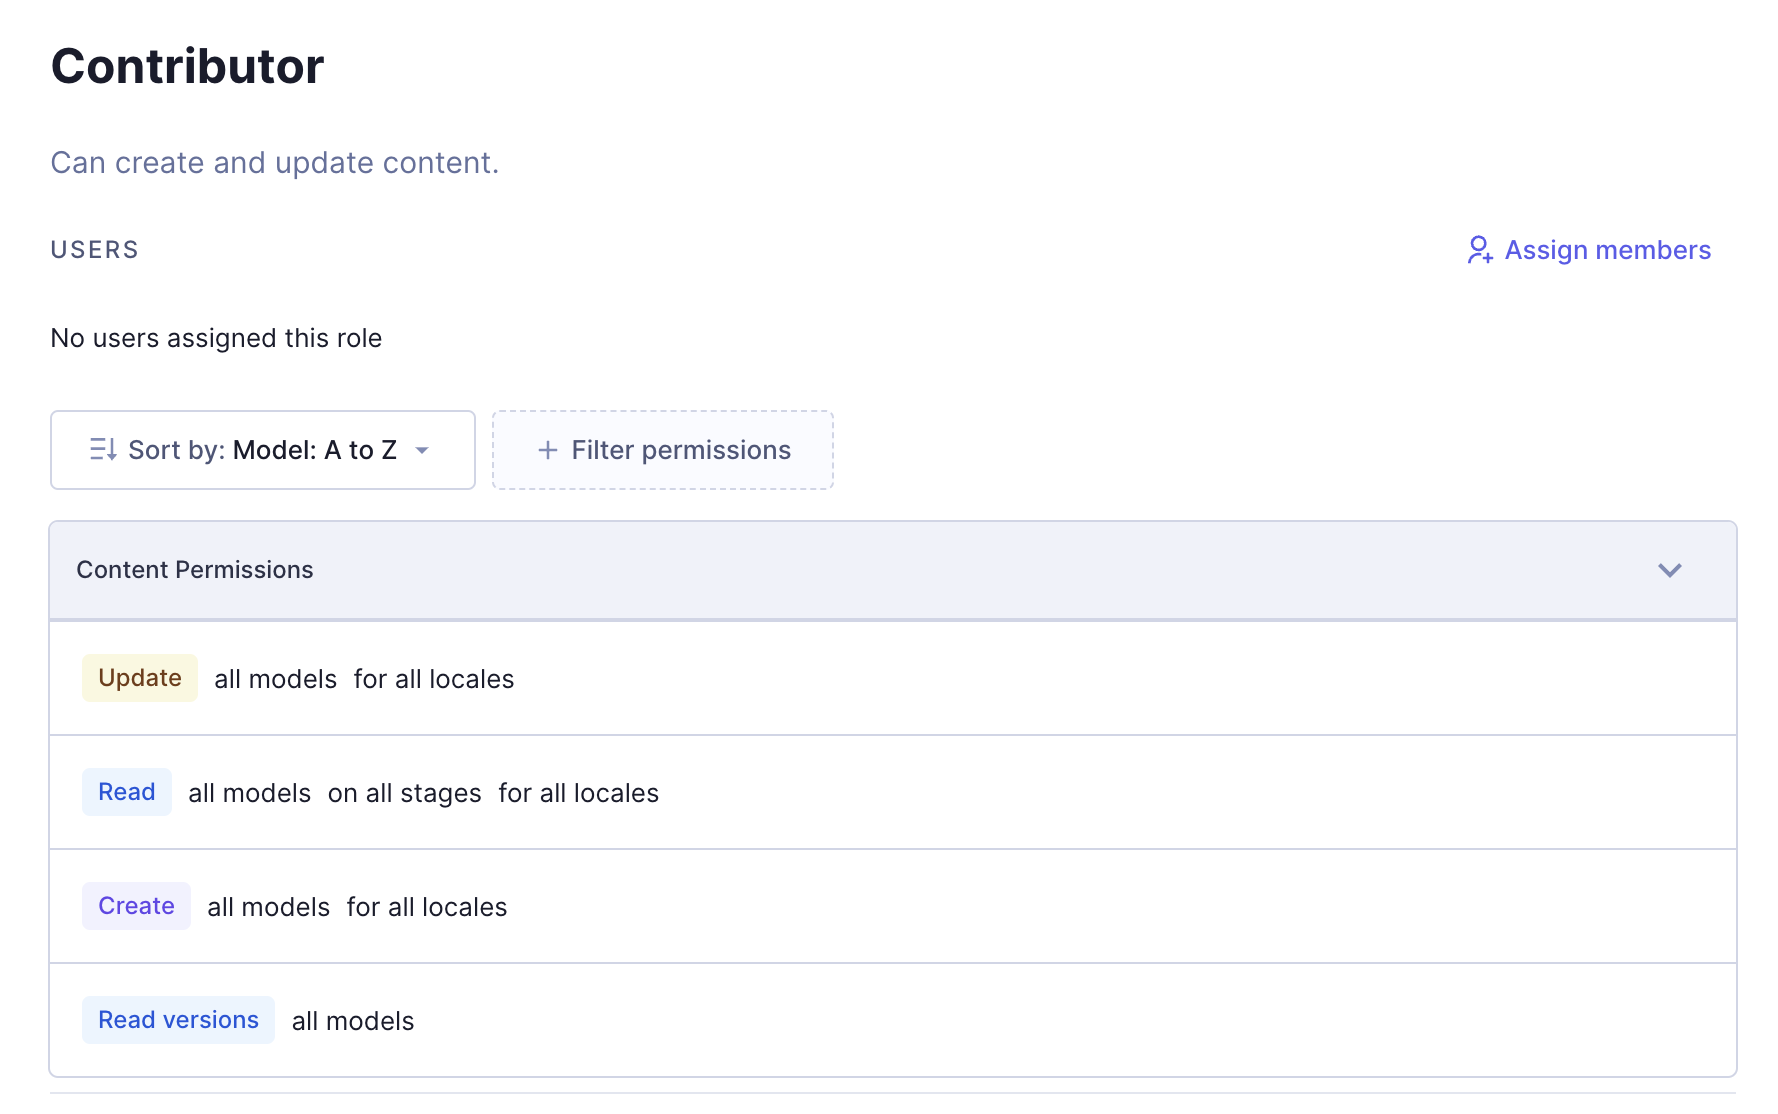 Contributor role permissions
As you can see, this role can create content but not publish it. This means they can save to DRAFT but not to PUBLISHED.
All you have to do is make sure that you assign your content authors to the Contributor role, and then assign the users who will go into that DRAFT content, supervise and save it to PUBLISHED to the Editor role.
As a result of this configuration, users that you assign to the Contributor role, will see the button to save content in the UI, but not the button to publish it:
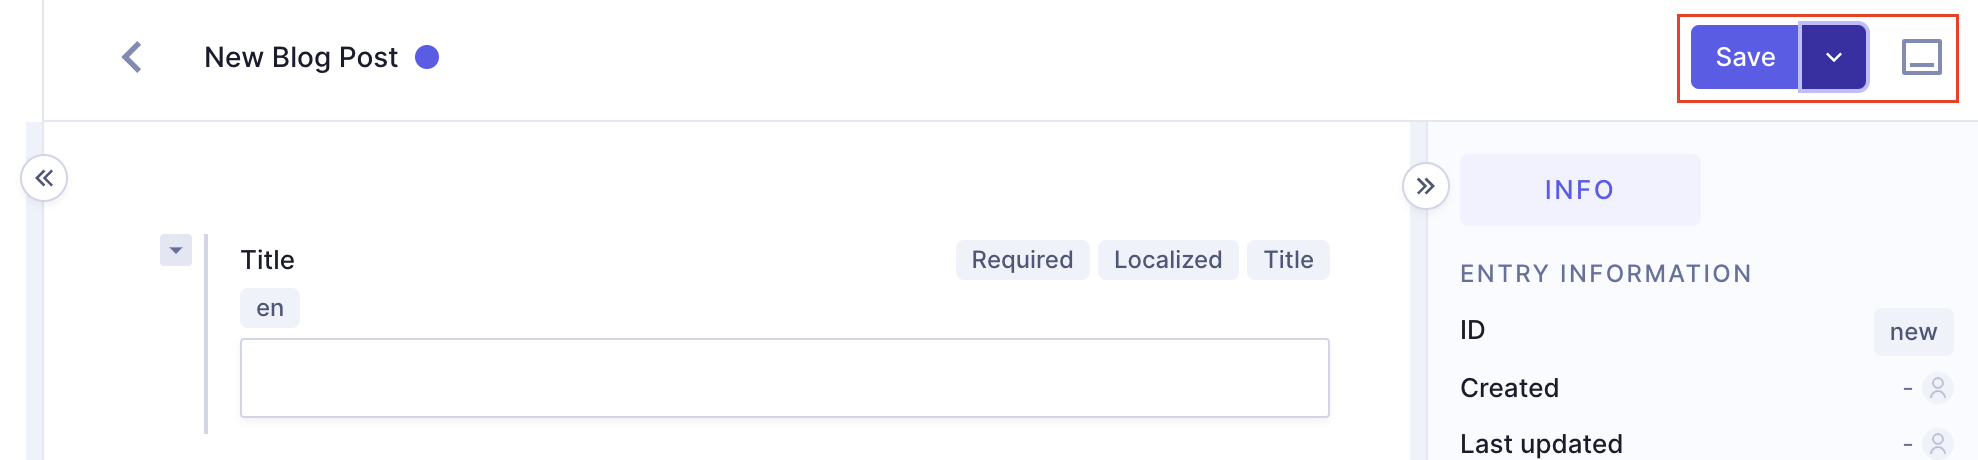 User without publish permissions
#Approval flow with 3 stages
This example is similar to the previous one, except we have added a custom content stage called APPROVAL.
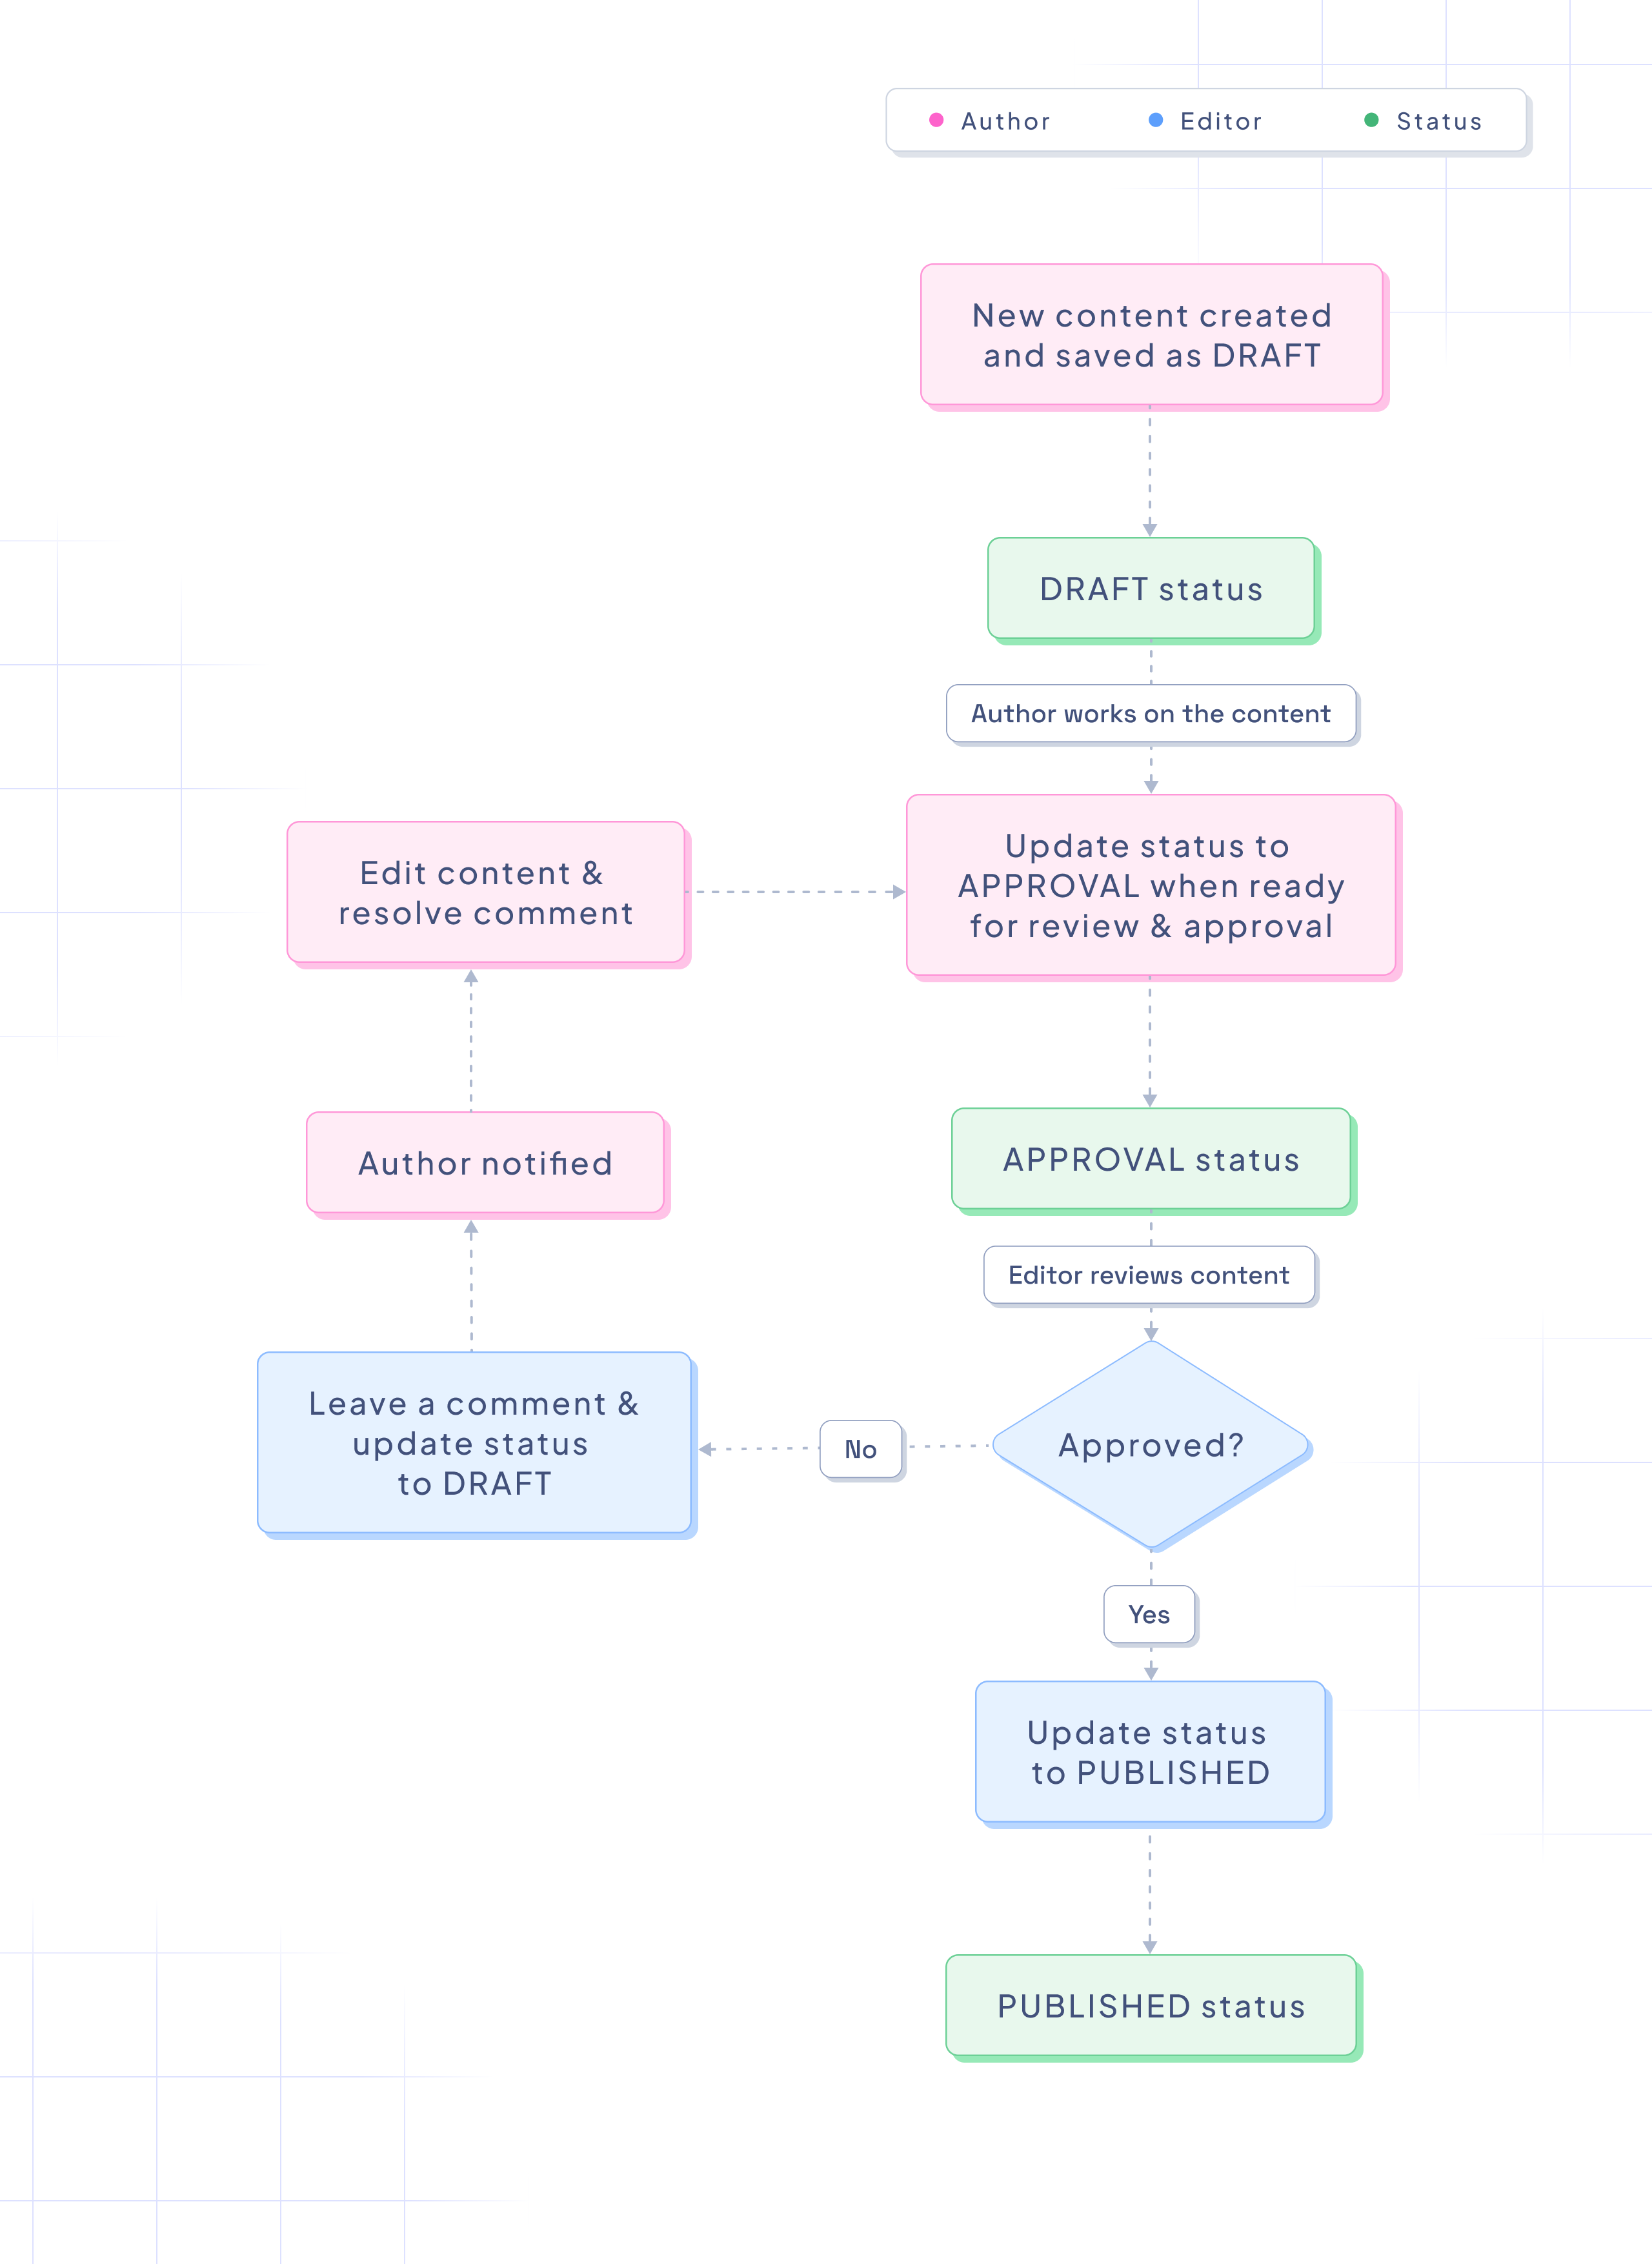 Approval flow with 3 stages
Now the Author has permissions to move the content stage from DRAFT to APPROVAL when it's ready for review.
The Editor can then look into the content entries on stage APPROVAL and supervise like in the previous example, deciding which content is ready and can be published to the PUBLISHED stage, versus which content needs to still be working on and move it back to DRAFT so the Author can keep working on it.
In this setup, the Author would have publish permissions from stage DRAFT to APPROVAL, which would allow them to work on draft content that can be set for revision when it's ready. The Editor would have publish permissions to take the content from all stages to all stages; this way, they can publish content that is ready, but also send content that needs further work back to the DRAFT stage.
- Click here to learn more about roles & permissions
- Click here to check out our API Reference on permissions
Creating a Custom view showing only the content entries in the APPROVAL stage will make it easier for our Editor to access the content they need to review.
#Set up approval flows with 3 stages
This workflow uses the system Editor role, and adds custom stages, and a custom Author role with permissions that are similar to but more limited than the Editor role.
To set up a custom stage, navigate to Project settings > Access > Roles & Permissions, click on + Add stage, and use the following information:
| Field | Input |
|---|---|
| Display name | Review |
| API ID | REVIEW |
| COLOR | Use the dropdown menu to pick a color for your custom stage. We picked Brown |
To set up the custom role, navigate to Project settings > General > Content stages, and click + Add custom role in the Custom roles section of the screen.
Give your role a Name - in this case we're using Author - and optional Description, and click Add to save. The role is now on the list of custom roles, but still needs to have its permissions configured. To do this, click on the three-dots context menu of your new role and select View permissions.
In the Content Permissions section, click on + Add permission and use the following information:
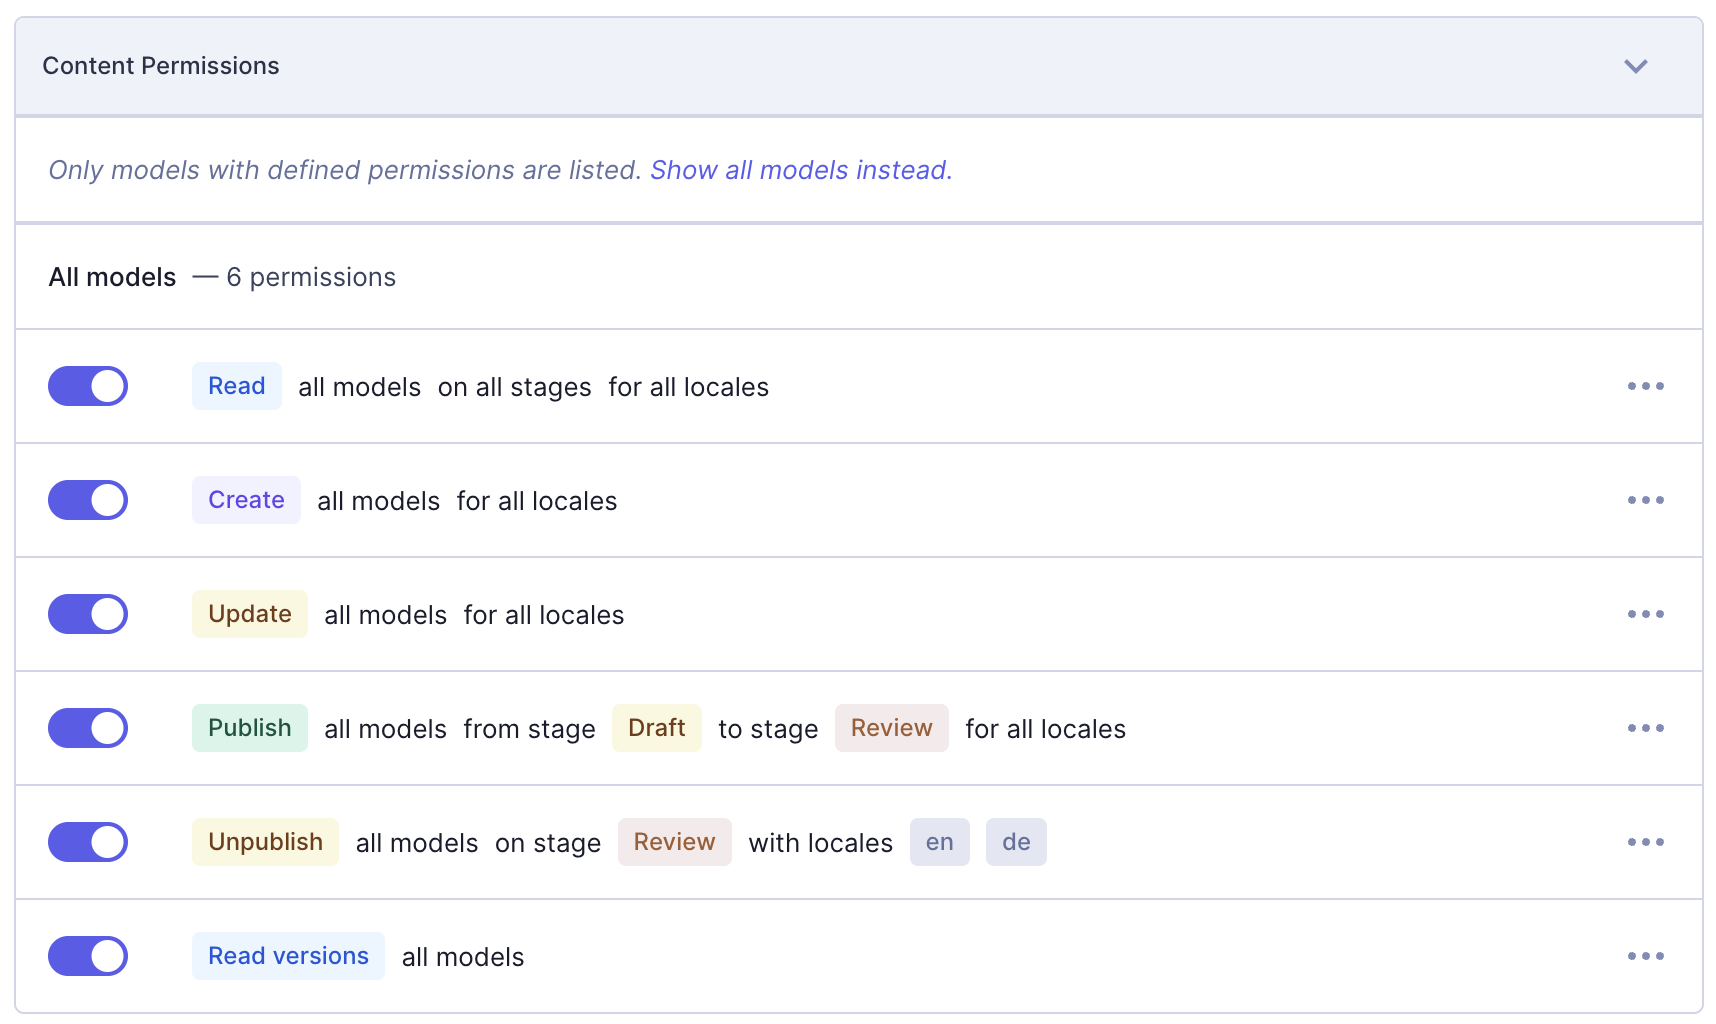 Approval flow with 3 stages: Content permissions
| Permission | Details |
|---|---|
Read | Select this permission for all models on all stages and for all locales |
Create | Select this permission for all models for all locales |
Update | Select this permission for all models for all locales |
Publish | Select this permission for all models, from stage DRAFT to stage REVIEW, and for all locales |
Unpublish | Select this permission for all models on stage REVIEW, and for all locales |
Read versions | Select this permission for all models |
The Model selection dropdown is for all permissions being added at one time. In this case, you selected it only once and then selected the permissions with their corresponding locales and stages.
If some of your permissions apply to certain models only, you will have to add them separately by repeating the process.
Now, move on to the Management API Permissions screen section and click Edit permissions. We only need to add two more permissions here so our Authors will be able to create entries and save them to DRAFT.
Look for and select the checkboxes of the following permissions:
- Create new entries
- Update existing non-published entries
- Update published entries
- Publish non published entries
The list is quite long, but you can use ctrl/cmd+f to find the permissions.
As a result of this configuration, users that you assign to the Author role, will be able to create and save entries in the DRAFT stage, and save them to the REVIEW stage when they are ready to be revised by the Editor role.
In this flow, Authors are not able to save content to PUBLISHED, but Editors are.
In the UI, Authors can save content that needs to remain in the DRAFT stage, and then publish the content to the REVIEW stage when it's ready for the Editor to take over:
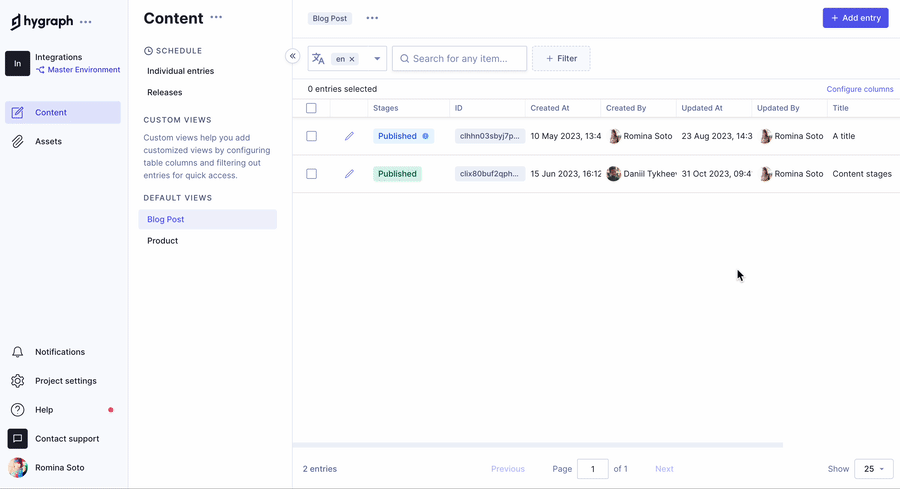 User can publish to REVIEW but not to PUBLISHED